Table of Contents
LwA or Login with Amazon is available for Web, TV/Other Devices, Android, and iOS. At this time of writing this guide is for Compose 1.6 Multiplatform and Amazon SDK 3.
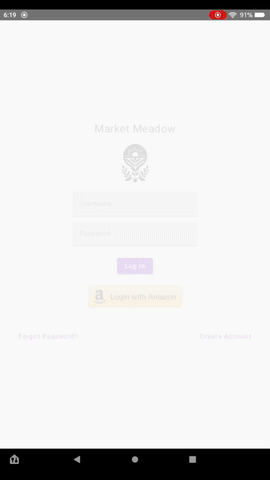
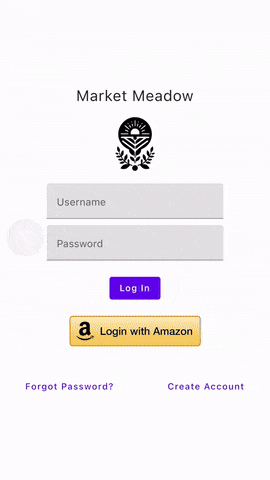
Android(Left) & iOS(Right)
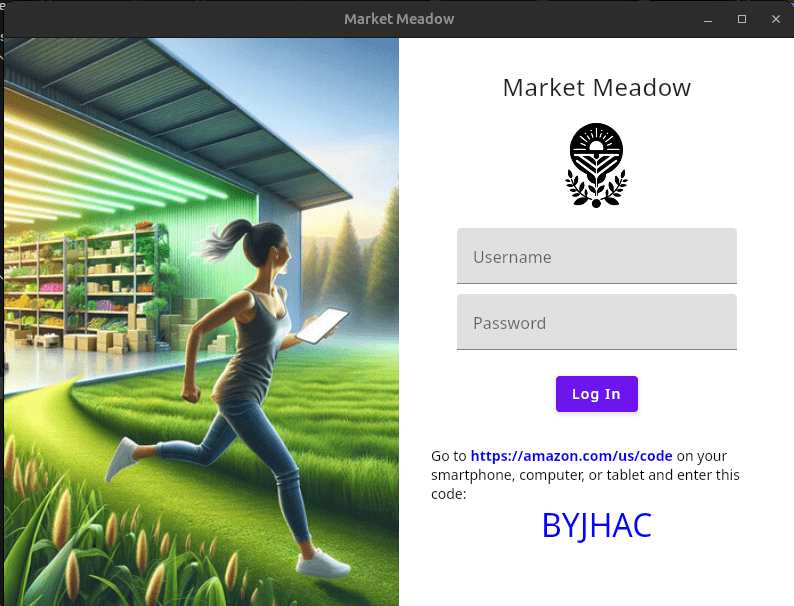
Desktop
Adding Amazon SDK To Android
You have two options, use the Maven repository or download .jar files directly from the Amazon Developer website. I'll cover how to add the dependency via the Maven repository. Oddly enough LwA isn't in Maven so you need to manually add the JAR in our build. Download LwA from https://developer.amazon.com/docs/apps-and-games/sdk-downloads.html
Unzip the zip file and place login-with-amazon-sdk.jar at composeApp/libs/login-with-amazon-sdk.jar
Adding Packages from Maven into build.gradle.kts
I wish this was easier but we are adding in several critical libraries for any Compose Multiplatform app, so you may already have some of these defined. We'll be adding:
- Ktor (HTTP Requests)
- Coroutines (Async Outside UI)
- serialization (JSON Parsing)
Open your gradle build files for composeApp located here:
File: gradle/libs.versions.toml
[versions]
#... others
ktor = "2.3.9"
coroutines = "1.7.3"
serialization = "1.6.3"

[libraries]
#... others
ktor-client-core = { module = "io.ktor:ktor-client-core", version.ref = "ktor" }
ktor-client-okhttp = { module = "io.ktor:ktor-client-okhttp", version.ref = "ktor" }
ktor-client-darwin = { module = "io.ktor:ktor-client-darwin", version.ref = "ktor" }
kotlinx-coroutines-core = { module = "org.jetbrains.kotlinx:kotlinx-coroutines-core", version.ref = "coroutines" }
kotlinx-coroutines-android = { module = "org.jetbrains.kotlinx:kotlinx-coroutines-android", version.ref = "coroutines" }
kotlinx-serialization-core = { module = "org.jetbrains.kotlinx:kotlinx-serialization-core", version.ref = "serialization" }
kotlinx-serialization-json = { module = "org.jetbrains.kotlinx:kotlinx-serialization-json", version.ref = "serialization" }


[plugins]
#... others
kotlin-serialization = { id = "org.jetbrains.kotlin.plugin.serialization", version.ref = "kotlin" }
File: composeApp/build.gradle.kts
plugins {
    //... other plugins
    alias(libs.plugins.kotlin.serialization) // For JSON
}

kotlin {
    //...
    sourceSets {

        androidMain.dependencies {
            //... others
            // Add Amazon SDK 3
            implementation("com.amazon.device:amazon-appstore-sdk:3.+")
            // Add LwA - This will include all JAR files in the libs folder
            implementation(fileTree(mapOf("dir" to "libs", "include" to listOf("*.jar"))))
            // HTTP Requests & Coroutines
            implementation(libs.ktor.client.okhttp)
            implementation(libs.kotlinx.coroutines.android)
        }
        nativeMain.dependencies {
            //... others
            // Http Requests for iOS
            implementation(libs.ktor.client.darwin)
        }
        commonMain.dependencies {
            //... others
            // HTTP Requests & JSON && Coroutines
            implementation(libs.ktor.client.core)
            implementation(libs.ktor.client.core)
            implementation(libs.kotlinx.coroutines.core)

            implementation(libs.kotlinx.serialization.core)
            implementation(libs.kotlinx.serialization.json)
        }
        desktopMain.dependencies {
            //... others
            implementation(libs.ktor.client.okhttp)
        }
Now reload your Gradle build.
Adjust AndroidManifest.xml
For this to work we need to add the intent so our app can re-open when they are authorized, or cancel the action.
<?xml version="1.0" encoding="utf-8"?>
<manifest xmlns:android="http://schemas.android.com/apk/res/android">

    <application
            android:allowBackup="true"
            android:icon="@mipmap/ic_launcher"
            android:label="@string/app_name"
            android:roundIcon="@mipmap/ic_launcher_round"
            android:supportsRtl="true"
            android:theme="@android:style/Theme.Material.Light.NoActionBar">
        <!-- You other activities as before -->
        <!-- .... -->
        <!-- Add Amazon Identity -->
        <activity android:name="com.amazon.identity.auth.device.workflow.WorkflowActivity"
                  android:theme="@android:style/Theme.NoDisplay"
                  android:allowTaskReparenting="true"
                  android:launchMode="singleTask"
                  android:exported="true">
            <intent-filter>
                <action android:name="android.intent.action.VIEW"/>
                <category android:name="android.intent.category.DEFAULT"/>
                <category android:name="android.intent.category.BROWSABLE"/>
                <data android:host="${applicationId}" android:scheme="amzn"/>
            </intent-filter>
        </activity>
    </application>

    <!-- Make sure we have internet permissions -->
    <uses-permission android:name="android.permission.INTERNET"/>
    <uses-permission android:name="android.permission.ACCESS_NETWORK_STATE"/>
</manifest>
Adding Placeholder Classes
Compose Multiplatform lets us setup platform specific implementation between JVM(Desktop), Native(iOS) and Android. But first we need to declare are expected class and interface.
File: composeApp/src/commonMain/kotlin/AmazonLogin.kt
import androidx.compose.runtime.compositionLocalOf

expect class AmazonLoginFactory {
    fun createAmazonLogin(): AmazonLogin
}

interface AmazonLogin {
    fun authorize(onResult: (LoginResult) -> Unit)
}

val LocalAmazonLoginFactory = compositionLocalOf<AmazonLoginFactory?> { null }
Next, we need to declare the expected data we'll be passing back into LoginResult
File: composeApp/src/commonMain/kotlin/Login.kt
import io.ktor.client.*
import io.ktor.client.request.*
import io.ktor.client.request.forms.*
import io.ktor.client.statement.*
import io.ktor.http.*
import io.ktor.util.*
import kotlinx.serialization.*

enum class LoginState {
    IDLE, SUCCESS, ERROR, CANCELLED
}

@Serializable
data class UserData(
    @SerialName("user_id") val id: String,
    @SerialName("name") val name: String? = null,
    @SerialName("email") val email: String? = null,
    @SerialName("postal_code") val postalCode: String? = null
)

// Kotlin doesn't support discriminated types,
// so we need to use interfaces :(
interface DeviceAuthResult
interface DeviceTokenResult

@Serializable
data class DeviceTokenResponse(
    @SerialName("access_token") val accessToken: String? = null,
    @SerialName("refresh_token") val refreshToken: String? = null,
    @SerialName("token_type") val tokenType: String? = null,
    @SerialName("expires_in") val expiresIn: Int? = null,
    ): DeviceTokenResult

@Serializable
data class DeviceError(
    @SerialName("error_index") val errorIndex: String? = null,
    @SerialName("error_description") val errorDescription: String? = null,
    @SerialName("error") val error: String? = null,
    @SerialName("request_id") val requestId: String? = null,
    ): DeviceAuthResult, DeviceTokenResult

@Serializable
data class DeviceAuthResponse(
    @SerialName("device_code") val deviceCode: String,
    @SerialName("user_code") val userCode: String,
    @SerialName("verification_uri") val verificationUri: String,
    @SerialName("expires_in") val expiresIn: Int,
    @SerialName("interval") val interval: Int
): DeviceAuthResult

data class LoginResult(
    val state: LoginState,
    val message: String? = null,
    val accessToken: String? = null,
    val authorizationCode: String? = null,
    val user: UserData? = null,
    val clientId: String? = null,
    val redirectURI: String? = null,
    val device: DeviceAuthResponse? = null,
    val deviceError: DeviceError? = null,
    val deviceToken: DeviceTokenResponse? = null,
)

class CodePair {
    private val client = HttpClient()

    suspend fun create(): HttpResponse {
        return client.post("https://api.amazon.com/auth/o2/create/codepair") {
            contentType(ContentType.Application.FormUrlEncoded)
            setBody(FormDataContent(Parameters.build {
                append("response_type", "device_code")
                append("client_id", "amzn1.application-oa2-client.fe7825eb187d48ae969db7b4a11a3e87")
                append("scope", "profile")
            }).formData.formUrlEncode())
        }
    }

    suspend fun deviceToken(userCode: String, deviceCode: String): HttpResponse {
        return client.post("https://api.amazon.com/auth/o2/token") {
            contentType(ContentType.Application.FormUrlEncoded)
            setBody(FormDataContent(Parameters.build {
                append("user_code", userCode)
                append("device_code", deviceCode)
                append("grant_type", "device_code")
            }).formData.formUrlEncode())
        }
    }

    suspend fun userProfile(accessToken: String): HttpResponse {
        return client.get("https://api.amazon.com/user/profile") {
            contentType(ContentType.Application.FormUrlEncoded)
            bearerAuth(accessToken)
        }
    }

    suspend fun refreshToken(clientId: String, refreshToken: String): HttpResponse {
        return client.post("https://api.amazon.com/auth/o2/token") {
            contentType(ContentType.Application.FormUrlEncoded)
            setBody(FormDataContent(Parameters.build {
                append("client_id", clientId)
                append("refresh_token", refreshToken)
                append("grant_type", "refresh_token")
            }).formData.formUrlEncode())
        }
    }
}
We also need to update our root App() call to pass in the factory we just created. This is so we can access
the AmazonLoginFactory in any composable. We accomplish this by using the Composition Local provider.
Then any composable used under this provider lets us pull the AmazonLoginFactory.
File: composeApp/src/commonMain/kotlin/App.kt
    //-- imports...
    @Composable
    @Preview
    fun App(amazonLoginFactory: AmazonLoginFactory?) {
        CompositionLocalProvider(LocalAmazonLoginFactory provides amazonLoginFactory) {
            //-- Your primary composable
            Homepage()
        }
    }
    //-- rest of your code
Designing Button && Login Response
Head over to https://developer.amazon.com/docs/login-with-amazon/button.html and download the buttons. I choose the gold version of Login with Amazon. Then we can use the new composeResources to share resources between platforms. I wish they provided vector drawables instead of bitmap images.
Medium
composeApp/src/commonMain/composeResources/drawable-mdpi/btnlwa_gold_loginwithamazon.pngcomposeApp/src/commonMain/composeResources/drawable-mdpi/btnlwa_gold_loginwithamazon_pressed.png
High
composeApp/src/commonMain/composeResources/drawable-hdpi/btnlwa_gold_loginwithamazon.png
composeApp/src/commonMain/composeResources/drawable-hdpi/btnlwa_gold_loginwithamazon_pressed.png
xHigh
composeApp/src/commonMain/composeResources/drawable-xhdpi/btnlwa_gold_loginwithamazon.png
composeApp/src/commonMain/composeResources/drawable-xhdpi/btnlwa_gold_loginwithamazon_pressed.png
xxHigh
composeApp/src/commonMain/composeResources/drawable-xxhdpi/btnlwa_gold_loginwithamazon.png
composeApp/src/commonMain/composeResources/drawable-xxhdpi/btnlwa_gold_loginwithamazon_pressed.png
composeApp/src/commonMain/kotlin/components/LwA.kt
package components

// CHANGE THIS TO YOUR APP NAME!
import myapp.composeapp.generated.resources.Res
import myapp.composeapp.generated.resources.btnlwa_gold_loginwithamazon
import myapp.composeapp.generated.resources.btnlwa_gold_loginwithamazon_pressed
// END CHANGE

import AmazonLoginFactory
import LoginResult
import androidx.compose.foundation.Image
import androidx.compose.foundation.clickable
import androidx.compose.foundation.interaction.MutableInteractionSource
import androidx.compose.foundation.interaction.collectIsPressedAsState
import androidx.compose.foundation.layout.*
import androidx.compose.foundation.text.ClickableText
import androidx.compose.material.Button
import androidx.compose.material.ButtonDefaults
import androidx.compose.material.CircularProgressIndicator
import androidx.compose.material.Text
import androidx.compose.runtime.Composable
import androidx.compose.runtime.getValue
import androidx.compose.runtime.mutableStateOf
import androidx.compose.runtime.remember
import androidx.compose.ui.Alignment
import androidx.compose.ui.Modifier
import androidx.compose.ui.graphics.Color
import androidx.compose.ui.text.SpanStyle
import androidx.compose.ui.text.TextStyle
import androidx.compose.ui.text.buildAnnotatedString
import androidx.compose.ui.text.font.FontWeight
import androidx.compose.ui.text.style.TextDecoration
import androidx.compose.ui.text.withStyle
import androidx.compose.ui.unit.dp
import androidx.compose.ui.unit.sp
import org.jetbrains.compose.resources.ExperimentalResourceApi
import org.jetbrains.compose.resources.painterResource
import org.jetbrains.compose.ui.tooling.preview.Preview


//-- I really like how Flutter has stateful and stateless widgets, so this would be a stateless
// composible. Why? Because then you can preview it in all its states as you cannot mock `interactionSource`
@Composable
@OptIn(ExperimentalResourceApi::class)
fun LogInWithAmazonButton(onClick: () -> Unit, isPressed: Boolean = false) {
    val normalImage = painterResource(Res.drawable.btnlwa_gold_loginwithamazon)
    val pressedImage = painterResource(Res.drawable.btnlwa_gold_loginwithamazon_pressed)

    Button(
        onClick = onClick,
        elevation = ButtonDefaults.elevation(defaultElevation = 0.dp, pressedElevation = 0.dp),
        colors = ButtonDefaults.buttonColors(
            backgroundColor = Color.Transparent,
            contentColor = Color.Transparent,
            disabledBackgroundColor = Color.Transparent,
            disabledContentColor = Color.Transparent
        ),
        contentPadding = PaddingValues(0.dp),
        modifier = Modifier.sizeIn(minWidth = 1.dp, minHeight = 1.dp)
    ) {
        Image(
            painter = if (isPressed) pressedImage else normalImage,
            contentDescription = "Log in with Amazon button"
        )
    }
}

//-- Separate the interactive aspects so we can preview the button when pressed and not pressed
@Composable
@OptIn(ExperimentalResourceApi::class)
fun LogInWithAmazonButtonStateful(onClick: () -> Unit) {
    val interactionSource = remember { MutableInteractionSource() }
    val isPressed by interactionSource.collectIsPressedAsState()

    LogInWithAmazonButton(onClick, isPressed)
}

//-- The loading / cancel button - explained in the next bit why we need cancel.
@Composable
fun LoadingWithCancelButton(onCancel: () -> Unit) {
    Column(
        modifier = Modifier.wrapContentSize(),
        horizontalAlignment = Alignment.CenterHorizontally
    ) {
        CircularProgressIndicator()
        Spacer(modifier = Modifier.height(8.dp)) // Adds a little space between the loader and the cancel button.
        Text(
            text = "Cancel",
            modifier = Modifier.clickable(onClick = onCancel),
            style = TextStyle(
                color = Color.Blue,
                fontSize = 18.sp,
                textDecoration = TextDecoration.Underline
            )
        )
    }
}

//-- Desktop version to show device code to log into with
@Composable
fun DeviceCodeView(url: String, userCode: String) {
    Column(
        modifier = Modifier.wrapContentSize(),
        horizontalAlignment = Alignment.CenterHorizontally
    ) {
        Spacer(modifier = Modifier.height(8.dp))

        val annotatedText = buildAnnotatedString {
            append("Go to ")

            // Style and tag the clickable text
            pushStringAnnotation(tag = "URL", annotation = url)
            withStyle(style = SpanStyle(color = Color.Blue, fontSize = 14.sp, fontWeight = FontWeight.Bold)) {
                append(url)
            }
            pop()

            append(" on your smartphone, computer, or tablet and enter this code:")
        }

        ClickableText(
            text = annotatedText,
            onClick = { offset ->
                annotatedText.getStringAnnotations(tag = "URL", start = offset, end = offset)
                    .firstOrNull()?.let { annotation ->
                        // Here, call your function to open the URL in the browser
                        // Make sure this function is properly implemented to handle the action
                    }
                      },
            style = TextStyle(fontSize = 14.sp) // Updated to use SpanStyle for consistency
        )

        Text(
            text = userCode,
            style = TextStyle(
                color = Color.Blue,
                fontSize = 32.sp,
            )
        )
    }
}


@Composable
fun LogInWithAmazon(amazonLoginFactory: AmazonLoginFactory?) {
    val loginResult = remember { mutableStateOf(LoginResult(LoginState.IDLE)) }
    val isLoading = remember { mutableStateOf(false) }

    if (isLoading.value) {
        //-- We need to have cancel logic for non-kindle devices, as you'll be taken
        // to your default web browser and the app will never recieve ERROR or CANCEL.
        // So we need a way to reset the button to be re-clicked. The loading is only
        // here for older device as they can see the button change before loading the
        // auth window / browser.
        LoadingWithCancelButton(onCancel = {isLoading.value = false})
    } else if (loginResult.value.state != LoginState.SUCCESS) {
        LogInWithAmazonButtonStateful(onClick = {
            // Reset login result before starting a new login attempt
            loginResult.value = LoginResult(LoginState.IDLE)
            isLoading.value = true
            amazonLoginFactory?.createAmazonLogin()?.authorize { result ->
                isLoading.value = false
                loginResult.value = result
            }
        })
    }

    // We cannot really await, so instead we react to loginResult to change the UI as needed
    // maybe you'll redirect instead via nagivation
 when (loginResult.value.state) {
        LoginState.SUCCESS -> {
            if (loginResult.value.device != null) {
                val deviceAuth = loginResult.value.device!!

                DeviceCodeView(deviceAuth.verificationUri, deviceAuth.userCode)
            } else if (loginResult.value.deviceError != null) {
                val error = loginResult.value.deviceError!!

                Text("error: ${error.error}")
                Text("errorDescription: ${error.errorDescription}")
                Text("requestId: ${error.requestId}")
                Text("errorIndex: ${error.errorIndex}")
            } else {
                // This is where you'll handle the successful login!
                Text("Login Success")
                Text("clientId: ${loginResult.value.clientId}")
                Text("accessToken: ${loginResult.value.accessToken}")
                Text("authorizationCode: ${loginResult.value.authorizationCode}")
                Text("message: ${loginResult.value.message}")
                Text("redirectURI: ${loginResult.value.redirectURI}")
                Text("user:")
                Text("   -> id: ${loginResult.value.user?.id}") // You use this to track the Amazon User ID
                Text("   -> name: ${loginResult.value.user?.name}")
                Text("   -> email: ${loginResult.value.user?.email}")
                Text("   -> postalCode: ${loginResult.value.user?.postalCode}")
            }
        }
}

// PREVIEWS

@Preview
@Composable
fun PreviewDeviceCodeView() {
    DeviceCodeView("https://amazon.com/us/code", "EL9KRP")
}

//-- Sadly we cannot preview the cancel button, any composable with animation never completes "rendering"
@Preview
@Composable
fun PreviewLoadingWithCancelButton() {
    LoadingWithCancelButton(onCancel = {})
}

@Preview
@Composable
fun PreviewLaWPressed() {
    Row(
        horizontalArrangement = Arrangement.Center,
        modifier = Modifier.fillMaxWidth().padding(all = 10.dp)
    ) {
        LogInWithAmazonButton(onClick = {}, isPressed = true)
    }
}

@Preview
@Composable
fun PreviewLaWNotPressed() {
    Row(
        horizontalArrangement = Arrangement.Center,
        modifier = Modifier.fillMaxWidth().padding(all = 10.dp)
    ) {
        LogInWithAmazonButton(onClick = {})
    }
}
Android Implementation
The api_key.txt was probably the most annoying part of all of this as they want an MD5 signature, which isn't provided
anymore by Android's tools.
api_key.txt
The exact location is here composeApp/src/androidMain/assets/api_key.txt, but you'll need to go through the process
creating an Amazon developer account, security profile, etc.
Creating a Security Profile
Head over to https://developer.amazon.com/loginwithamazon/console/site/lwa/overview.html and click
on Create a New Security Profile. Then fill out the items for the security profile:
Security Profile Name- This is what the user sees when viewing permissions screenSecurity Profile Description- This is not shown to the user, so whatever makes sense to youConsent Privacy Notice URL- Also not shown to the user, it doesn't even need to really exist just a valid URLConsent Logo Image- The Logo is shown to the user
At this time of writing this is not reviewed and is immeidately avialable to use.
Adding API Key
This part confused me as you are not adding an API Key, you are generating one, based on your keystore you use for
development and release builds. I'll assume you already have a development and release keystore.
Getting the Android Developer Debug MD5 / Sha256
Keytool is from your Java installation so whereever Java is installed is where you'll find keytool. I'll assume you
already have Java in your envoironmental path. On Linux and macOS your debug.keystore is located
here ~/.android/debug.keystore but on windows its located at %USERPROFILE%\.android\debug.keystore
Linux/macOS
keytool -list -v -keystore ~/.android/debug.keystore -alias androiddebugkey -storepass android -keypass android
Windows
keytool -list -v -keystore %USERPROFILE%\.android\debug.keystore -alias androiddebugkey -storepass android -keypass android
This will give us our SHA256 i.e:
SHA256: 1D:6E:AD:A2:3C:FF:F0:BC:97:6A:49:A9:A7:.......
However we do not have MD5 which is still required from Amazon so we need openssl. First convert the keystore to
a ceritficate:
keytool -exportcert -keystore ~/.android/debug.keystore -alias androiddebugkey -file androiddebugkey.crt
Then use openssl to generate the MD5:
openssl x509 -inform der -in androiddebugkey.crt -md5 -noout -fingerprint
This will finally give you your MD5 i.e:
MD5 Fingerprint=63:90:E7:01:15:A1:....
Now that we have this is can add our API key information:
- API Key Name - This can be whatever you want but maybe decern what is release versus debug.
- Package - This is the package name of your app, you pull this from
composeApp/build.gradle.kts
    android {
        namespace = "com.example.myapp" // <-- This namespace is your package name
- MD5 Signature - The value got before without the
SHA256:part - SHA256 Signature- The value got before without the
MD5 Fingerprint=part
Now click add and you're given the API Key for composeApp/src/androidMain/assets/api_key.txt. If you see it,
go back to the Amazon/Kindle Settings and under "API Key" click Show.
Android Code
A critical aspect is only collecting the data you NEED from your customer. So assign the scopes needed,
i.e ProfileScope.userId() is you only need a customer ID to work with. Here are the list of scopes currently possible:
- ProfileScope.userId() - ID of user you'll use to track user in your system
- ProfileScope.profile() - Name and email address
- ProfileScope.postalCode() - Postal Code / Zipcode
composeApp/src/androidMain/kotlin/AmazonLogin.android.kt
import com.amazon.identity.auth.device.AuthError
import com.amazon.identity.auth.device.api.authorization.*
import com.amazon.identity.auth.device.api.workflow.RequestContext

actual class AmazonLoginFactory(private val requestContext: RequestContext) {
    actual fun createAmazonLogin(): AmazonLogin = AmazonLoginAndroid(requestContext)
}

class AmazonLoginAndroid(private val requestContext: RequestContext) : AmazonLogin {
    private var authorizeListener: AuthorizeListener? = null

    override fun authorize(onResult: (LoginResult) -> Unit) {
        // Remove the listeners if we are authroizing again to now get duplicate responses
        authorizeListener?.let { requestContext.unregisterListener(it) }

        // Create a new listener
        authorizeListener = object : AuthorizeListener() {
            override fun onSuccess(result: AuthorizeResult) {
                // Dpeneding on the scopes added these could be blank
                val userData = UserData(
                    id = result.user?.userId ?: "",
                    name = result.user?.userName ?: "",
                    email = result.user?.userEmail ?: "",
                    postalCode = result.user?.userPostalCode ?: ""
                )

                onResult(
                    LoginResult(
                        state = LoginState.SUCCESS,
                        message = "Authorized",
                        accessToken = result.accessToken,
                        authorizationCode = result.authorizationCode,
                        user = userData,
                        clientId = result.clientId,
                        redirectURI = result.redirectURI
                    )
                )
            }

            override fun onError(ae: AuthError) {
                onResult(LoginResult(LoginState.ERROR, ae.message))
            }

            override fun onCancel(cancellation: AuthCancellation) {
                onResult(LoginResult(LoginState.CANCELLED, "Cancelled by user"))
            }
        }

        // Register the new listener
        requestContext.registerListener(authorizeListener)


        AuthorizationManager.authorize(
            AuthorizeRequest.Builder(requestContext)
                // CHANGE YOUR SCOPES HERE AS NEEDED: profile, userId, postalCode
                .addScopes(ProfileScope.userId()) // Add more scopes via "," i.e .addScopes(ProfileScope.profile(), ProfileScope.postalCode())
                .build()
        )
    }
}
Lastly we need to modify the MainActivity.kt via composeApp/src/androidMain/kotlin/com/CHANGE/MYAPP/MainActivity.kt
package com.CHANGEME.MYAPP // CHANGE THE PACKAGE TO MATCH YOURS

import AmazonLoginFactory
import App
import android.os.Bundle
import androidx.activity.ComponentActivity
import androidx.activity.compose.setContent
import androidx.compose.runtime.Composable
import androidx.compose.ui.tooling.preview.Preview
// Amazon App SDK / Log In SDK
import com.amazon.identity.auth.device.api.workflow.RequestContext

class MainActivity : ComponentActivity() {
    private lateinit var requestContext: RequestContext // Define RequestContext

    override fun onCreate(savedInstanceState: Bundle?) {
        super.onCreate(savedInstanceState)

        requestContext = RequestContext.create(this) // Setup requestContext

        val amazonLoginFactory = AmazonLoginFactory(requestContext // Pass into our AmazonLoginFactory

        setContent {
            App(amazonLoginFactory = amazonLoginFactory) // Pass amazonLoginFactory back into our Compose UI
        }
    }

    @Override
    override fun onResume() {
        super.onResume()
        requestContext.onResume() // Assign onResume when coming back to the app from Browser or another App
    }
}

@Preview
@Composable
fun AppAndroidPreview() {
    App(amazonLoginFactory = null) // Make sure preview still works!
}
Desktop (JVM) Implementation
There is no SDK for the desktop(JVM) verion, so instead we will use the TV/other devices API that Login with Amazon provides. This is because the web API requires us to stand up a web server thats publically accessible, and thats not easy.
File: composeApp/src/desktopMain/kotlin/main.kt
import androidx.compose.ui.window.Window
import androidx.compose.ui.window.application
import kotlinx.coroutines.CoroutineScope
import kotlinx.coroutines.Dispatchers
import kotlinx.coroutines.SupervisorJob
import kotlinx.coroutines.cancel


fun main() = application {
    // Create scope - We need this for async work outside the UI
    val applicationScope = CoroutineScope(SupervisorJob() + Dispatchers.IO)

    Window(onCloseRequest = {
        applicationScope.cancel() // Cancel the scope when the window is closed
        exitApplication()}, title = "YOU APP TITLE HERE CHANGE ME") {
        val amazonLoginFactory = AmazonLoginFactory(applicationScope)

        App(amazonLoginFactory = amazonLoginFactory)
    }
}
File: composeApp/src/desktopMain/kotlin/AmazonLogin.jvm.kt
import io.ktor.client.statement.*
import io.ktor.http.*
import kotlinx.coroutines.*
import kotlin.coroutines.coroutineContext
import kotlinx.serialization.json.*
import javax.swing.SwingUtilities

actual class AmazonLoginFactory(private val coroutineScope: CoroutineScope) {

    actual fun createAmazonLogin(): AmazonLogin {
        return AmazonLoginJvm(coroutineScope)
    }
}

class AmazonLoginJvm(private val coroutineScope: CoroutineScope) : AmazonLogin {
    private suspend fun createCodePair(): DeviceAuthResult {
        val response = CodePair().create()
        println(response.bodyAsText())

        return if (response.status == HttpStatusCode.OK) {
            Json.decodeFromString<DeviceAuthResponse>(response.bodyAsText())
        } else {
            Json.decodeFromString<DeviceError>(response.bodyAsText())
        }
    }

    override fun authorize(onResult: (LoginResult) -> Unit) {
        coroutineScope.launch {
            val deviceResult = createCodePair()
            var result: LoginResult? = null;

            when (deviceResult) {
                is DeviceAuthResponse -> {
                    result = LoginResult(LoginState.SUCCESS, message = "Success", device = deviceResult)

                    SwingUtilities.invokeLater {
                        onResult(result!!)
                    }

                    listen(deviceResult, onResult)
                }
                is DeviceError -> {
                    result = LoginResult(LoginState.ERROR, message = deviceResult.errorDescription, deviceError = deviceResult)

                    SwingUtilities.invokeLater {
                        onResult(result)
                    }
                }
            }
        }
    }

    /**
     * This polls to the end-point Amazon provides for the authorization
     */
    private suspend fun listen(deviceResult: DeviceAuthResponse, onResult: (LoginResult) -> Unit) {
        var tokenResult: DeviceTokenResult? = null
        val startTime = System.currentTimeMillis()
        val intervalMillis = deviceResult.interval.times(1000L)
        val expiresMillis = deviceResult.expiresIn.times(1000L)

        var shouldContinue = true // Control flag for the loop

        while (coroutineContext.isActive && System.currentTimeMillis() - startTime < expiresMillis && shouldContinue) {
            val response = CodePair().deviceToken(deviceResult.userCode, deviceResult.deviceCode)
            print(response.bodyAsText())
            if (response.status == HttpStatusCode.OK) {
                tokenResult = Json.decodeFromString<DeviceTokenResponse>(response.bodyAsText())
                shouldContinue = false // Set the flag to false to break the loop
            } else {
                tokenResult = Json.decodeFromString<DeviceError>(response.bodyAsText())
            }

            if (shouldContinue) {
                delay(intervalMillis)
            }
        }

        when (tokenResult) {
            is DeviceTokenResponse -> {
                val response = CodePair().userProfile(tokenResult.accessToken!!)
                print(response.bodyAsText())
                if (response.status == HttpStatusCode.OK) {
                    val user = Json.decodeFromString<UserData>(response.bodyAsText())
                    onResult(LoginResult(LoginState.SUCCESS,
                                         message = "Success",
                                         accessToken = tokenResult.accessToken!!,
                                         deviceToken = tokenResult as DeviceTokenResponse,
                                         user = user))
                } else {
                    onResult(LoginResult(LoginState.ERROR,
                                         message = "Unable to get user profile"))
                }
            }
            is DeviceError -> {
                onResult(LoginResult(LoginState.ERROR,
                                     message = (tokenResult as DeviceError).errorDescription ?: "Unknown error",
                                     deviceError = tokenResult as DeviceError))
            }
            else -> {
                onResult(LoginResult(LoginState.ERROR,
                                     message = "Timeout or no response"))
            }
        }
    }
}
iOS/iPadOS
Download LoginWithAmazon iOS SDK (3.1.3 as of writing) and use LoginWithAmazon.framework from the zip file.
Adding LoginWithAmazon.framework to XCode Project
We'll need to open XCode (Version 15.3 as of writing), and open iosApp/iosApp.xcodeproj.
- Copy into
LoginWithAmazon.frameworkintoiosApp/Library/LoginWithAmazon.framework - Go to your project, select
General - Under
Frameworks, Libraries, and Embedded Contentclick+(add) and add the following:- SafariServices.framework (do not embed)
- Security.framework (do not embed)
- LoginWithAmazon.framework (do not embed)
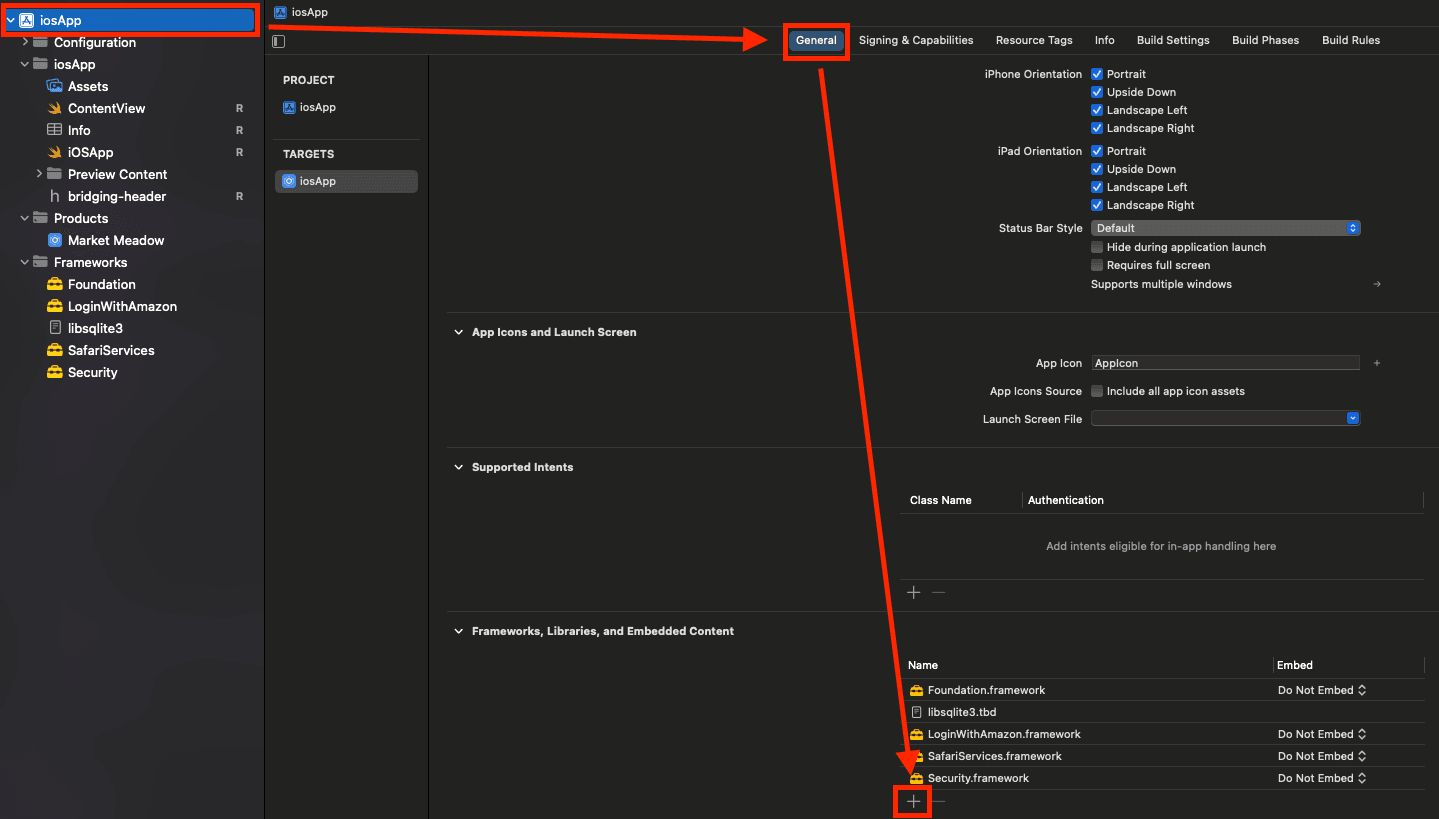
- Under
Build Phasesgo toEmbed Frameworksand remove LoginWithAmazon.framework altogether.
Adding Entitlements
Next we need to create a file iosApp/iosApp/iosApp.entitlements and change com.MYAPP.CHANGEBUNDLEIDENTIFIER.HERE
to your app bundle identifier you listed under General -> Identity -> Bundle Identifier
<?xml version="1.0" encoding="UTF-8"?>
<!DOCTYPE plist PUBLIC "-//Apple//DTD PLIST 1.0//EN" "http://www.apple.com/DTDs/PropertyList-1.0.dtd">
<plist version="1.0">
    <dict>
        <key>keychain-access-groups</key>
        <array>
            <string>$(AppIdentifierPrefix)com.MYAPP.CHANGEBUNDLEIDENTIFIER.HERE</string>
        </array>
    </dict>
</plist>
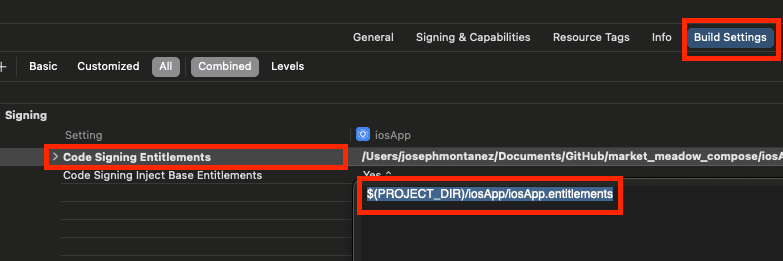
Then under Build Settings -> Code Signing Entitlements add $(PROJECT_DIR)/iosApp/iosApp.entitlements
Adding API Key to Info.plist
Edit iosApp/iosApp/Info.plist and add APIKey. You get this from the security profile you just created
from https://developer.amazon.com/loginwithamazon/console/site/lwa/overview.html and adding you bundle identifier for
iOS.
<key>APIKey</key>
<string>eyxxxxxxxxxxxxxxxlFD4jV/IJZiwSw==</string>
Adding AmazonLogin Code
XCode 15.3 requires Kotlin 1.9.23 and Compose Plugin 1.6.1 or higher, make sure you update gradle/libs.versions.toml. If not the interop code generation will fail: KT-65542 Cinterop tasks fails if Xcode 15.3 is used.
[versions]
#....otthers
compose-plugin = "1.6.1"
#....otthers
kotlin = "1.9.23"
Then reload your Gradle!
File: composeApp/src/iosMain/kotlin/MainViewController.kt
import androidx.compose.ui.window.ComposeUIViewController

fun MainViewController() = ComposeUIViewController {
    // Pass in the factory into our app like before
    val amazonLogin = AmazonLoginFactory();
    App(amazonLoginFactory = amazonLogin)
}
Please change AMZNProfileScope.userID() to only the data you NEED
- AMZNProfileScope.userID()
- AMZNProfileScope.profile()
- AMZNProfileScope.postalCode()
You can group them as needed
i.e listOf(AMZNProfileScope.userID(), AMZNProfileScope.profile(), AMZNProfileScope.postalCode())
File: composeApp/src/iosMain/kotlin/AmazonLogin.ios.kt
import platform.Foundation.*
import kotlinx.cinterop.*
import loginWithAmazon.*

actual class AmazonLoginFactory() {
    actual fun createAmazonLogin(): AmazonLogin = AmazonLoginIOS()
}

class AmazonLoginIOS : AmazonLogin {
    // Implement the authorize function to initiate the Amazon login process
    @OptIn(ExperimentalForeignApi::class)
    override fun authorize(onResult: (LoginResult) -> Unit) {
        // Initialize the Amazon login process here
        val request = AMZNAuthorizeRequest().apply {
            scopes = listOf(AMZNProfileScope.userID())
            interactiveStrategy = AMZNInteractiveStrategyAlways
            grantType = AMZNAuthorizationGrantTypeToken
        }

        val handler: ((AMZNAuthorizeResult?, Boolean, NSError?) -> Unit)? = { result: AMZNAuthorizeResult?, userDidCancel: Boolean, error: NSError? ->
            print(error)
            val loginResult = when {
                error != null -> LoginResult(LoginState.ERROR, error.localizedDescription)
                userDidCancel -> LoginResult(LoginState.CANCELLED, "User cancelled login.")
                result != null -> LoginResult(
                    LoginState.SUCCESS, "Login successful",
                    clientId = result.clientId,
                    user = UserData(
                        id = result.user?.userID!!,
                        name = result.user?.name)
                )
                else -> LoginResult(LoginState.ERROR, "Unknown error")
            }
            onResult(loginResult)
        }


        AMZNAuthorizationManager.sharedManager().authorize(request, handler)
    }
}
FAQ
How do I reset or delete my Amazon linked account for testing?
Manage apps & services with data access - https://www.amazon.com/ap/adam - Just find your app there and click delete.
My app is crashing when I click the button
Probably an issue with api_key.txt. It has to be in the right location and have the correct keystore attached to
your build.
Android - It says installed failed when testing it on another device
If you did not sign your debug build and giving it to someone else to try then the app will not install